單元 15 / 22
Azure CLI 歷史範例與 Google Cloud 帳戶概觀
下列命令及輸出取自舊版 Azure CLI。Microsoft Entra 與 Azure CLI 的命令介面可能已變更,實際操作前請先與 Microsoft 的現行文件及 Workload Security 的 Azure 應用程式設定文件比對。
Azure CLI 程式碼
文件
步驟 1
az ad app create --display-name CloudOneDemoApp
ge-1-0-4-801:~ ricka$ az ad app create --display-name CloudOneDemoApp
{
  "acceptMappedClaims": null,
  "addIns": [],
  "allowGuestsSignIn": null,
  "allowPassthroughUsers": null,
  "appId": "6d4ec31e-6908-4b77-9e4a-1a234b5c6de7",
  "appLogoUrl": null,
  "appPermissions": null,
  "appRoles": [],
  "applicationTemplateId": null,
  "availableToOtherTenants": false,
  "deletionTimestamp": null,
  "displayName": "CloudOneDemoApp",
  "errorUrl": null,
  "groupMembershipClaims": null,
  "homepage": null,
  "identifierUris": [],
  "informationalUrls": {
    "marketing": null,
    "privacy": null,
    "support": null,
    "termsOfService": null
  },
  "isDeviceOnlyAuthSupported": null,
  "keyCredentials": [],
  "knownClientApplications": [],
  "logo@odata.mediaContentType": "application/json;odata=minimalmetadata; charset=utf-8",
  "logo@odata.mediaEditLink": "directoryObjects/6920049c-2d4c-426d-9936-1a234b5c6de7/Microsoft.DirectoryServices.Application/logo",
  "logoUrl": null,
  "logoutUrl": null,
  "mainLogo@odata.mediaEditLink": "directoryObjects/6920049c-2d4c-426d-9936-1a234b5c6de7/Microsoft.DirectoryServices.Application/mainLogo",
  "oauth2AllowIdTokenImplicitFlow": true,
  "oauth2AllowImplicitFlow": false,
  "oauth2AllowUrlPathMatching": false,
  "oauth2Permissions": [
    {
      "adminConsentDescription": "Allow the application to access CloudOneDemoApp on behalf of the signed-in user.",
      "adminConsentDisplayName": "Access CloudOneDemoApp",
      "id": "2034dac4-f6ff-46ee-97ea-1a234b5c6de7",
      "isEnabled": true,
      "type": "User",
      "userConsentDescription": "Allow the application to access CloudOneDemoApp on your behalf.",
      "userConsentDisplayName": "Access CloudOneDemoApp",
      "value": "user_impersonation"
    }
  ],
  "oauth2RequirePostResponse": false,
  "objectId": "6920049c-2d4c-426d-9936-1a234b5c6de7",
  "objectType": "Application",
  "odata.metadata": "https://graph.windows.net/3e04753a-ae5b-42d4-a86d-1a234b5c6de7/$metadata#directoryObjects/@Element",
  "odata.type": "Microsoft.DirectoryServices.Application",
  "optionalClaims": null,
  "orgRestrictions": [],
  "parentalControlSettings": {
    "countriesBlockedForMinors": [],
    "legalAgeGroupRule": "Allow"
  },
  "passwordCredentials": [],
  "preAuthorizedApplications": null,
  "publicClient": null,
  "publisherDomain": "TrendMicro.onmicrosoft.com",
  "recordConsentConditions": null,
  "replyUrls": [],
  "requiredResourceAccess": [],
  "samlMetadataUrl": null,
  "signInAudience": "AzureADMyOrg",
  "tokenEncryptionKeyId": null,
  "wwwHomepage": null
}
"appId": "6d4ec31e-6908-4b77-9e4a-1a234b5c6de7"
步驟 2
az ad app credential reset --id 6d4ec31e-6908-4b77-9e4a-1a234b5c6de7
ge-1-0-4-801:~ ricka$ az ad app credential reset --id 6d4ec31e-6908-4b77-9e4a-1a234b5c6de7
{
  "appId": "6d4ec31e-6908-4b77-9e4a-1a234b5c6de7",
  "name": "6d4ec31e-6908-4b77-9e4a-1a234b5c6de7",
  "password": "3c5aae71-efe3-4e36-ab90-1a234b5c6de7",
  "tenant": "3e04753a-ae5b-42d4-a86d-1a234b5c6de7"
}
"password": "3c5aae71-efe3-4e36-ab90-a245e5e9fe04"
步驟 3
az account list
[
  {
    "cloudName": "AzureCloud",
    "homeTenantId": "3e04753a-ae5b-42d4-a86d-1a234b5c6de7",
    "id": "e9c8e00f-f6c1-412e-998b-1a234b5c6de7",
    "isDefault": true,
    "managedByTenants": [],
    "name": "Microsoft Azure Enterprise",
    "state": "Enabled",
    "tenantId": "3e04753a-ae5b-42d4-a86d-1a234b5c6de7",
    "user": {
      "name": "rick_abbott@trendmicro.com",
      "type": "user"
    }
  }
]
"tenantId": "3e04753a-ae5b-42d4-a86d-1a234b5c6de7"
"id": "e9c8e00f-f6c1-412e-998b-1a234b5c6de7"
步驟 4
az ad sp create --id 6d4ec31e-6908-4b77-9e4a-1a234b5c6de7
ge-1-0-4-801:~ ricka$ az ad sp create --id 6d4ec31e-6908-4b77-9e4a-1a234b5c6de7
{
  "accountEnabled": "True",
  "addIns": [],
  "alternativeNames": [],
  "appDisplayName": "CloudOneDemoApp",
  "appId": "6d4ec31e-6908-4b77-9e4a-1a234b5c6de7",
  "appOwnerTenantId": "3e04753a-ae5b-42d4-1a234b5c6de7",
  "appRoleAssignmentRequired": false,
  "appRoles": [],
  "applicationTemplateId": null,
  "deletionTimestamp": null,
  "displayName": "CloudOneDemoApp",
  "errorUrl": null,
  "homepage": null,
  "informationalUrls": {
    "marketing": null,
    "privacy": null,
    "support": null,
    "termsOfService": null
  },
  "keyCredentials": [],
  "logoutUrl": null,
  "notificationEmailAddresses": [],
  "oauth2Permissions": [
    {
      "adminConsentDescription": "Allow the application to access CloudOneDemoApp on behalf of the signed-in user.",
      "adminConsentDisplayName": "Access CloudOneDemoApp",
      "id": "2034dac4-f6ff-46ee-97ea-1a234b5c6de7",
      "isEnabled": true,
      "type": "User",
      "userConsentDescription": "Allow the application to access CloudOneDemoApp on your behalf.",
      "userConsentDisplayName": "Access CloudOneDemoApp",
      "value": "user_impersonation"
    }
  ],
  "objectId": "4312ebe2-fc73-4cf1-9962-1a234b5c6de7",
  "objectType": "ServicePrincipal",
  "odata.metadata": "https://graph.windows.net/3e04753a-ae5b-42d4-a86d-1a234b5c6de7/$metadata#directoryObjects/@Element",
  "odata.type": "Microsoft.DirectoryServices.ServicePrincipal",
  "passwordCredentials": [],
  "preferredSingleSignOnMode": null,
  "preferredTokenSigningKeyEndDateTime": null,
  "preferredTokenSigningKeyThumbprint": null,
  "publisherName": "TrendMicro",
  "replyUrls": [],
  "samlMetadataUrl": null,
  "samlSingleSignOnSettings": null,
  "servicePrincipalNames": [
    "6d4ec31e-6908-4b77-9e4a-1a234b5c6de7"
  ],
  "servicePrincipalType": "Application",
  "signInAudience": "AzureADMyOrg",
  "tags": [],
  "tokenEncryptionKeyId": null
}
步驟 5
az role assignment create --role "Reader" --assignee 6d4ec31e-6908-4b77-9e4a-1a234b5c6de7
ge-1-0-4-801:~ ricka$ az role assignment create --role "Reader" --assignee 6d4ec31e-6908-4b77-9e4a-1a234b5c6de7
{
  "canDelegate": null,
  "id": "/subscriptions/e9c8e00f-f6c1-412e-998b-1a234b5c6de7/providers/Microsoft.Authorization/roleAssignments/c458906e-e93c-429d-b22d-1a234b5c6de7",
  "name": "c458906e-e93c-429d-b22d-1a234b5c6de7",
  "principalId": "4312ebe2-fc73-4cf1-9962-1a234b5c6de7",
  "principalType": "ServicePrincipal",
  "roleDefinitionId": "/subscriptions/e9c8e00f-f6c1-412e-998b-1a234b5c6de7/providers/Microsoft.Authorization/roleDefinitions/acdd72a7-3385-48ef-1a234b5c6de7",
  "scope": "/subscriptions/e9c8e00f-f6c1-412e-998b-1a234b5c6de7",
  "type": "Microsoft.Authorization/roleAssignments"
}
影片中的舊版範例示範建立應用程式及指派 Reader 角色的概念。現行環境應先依 Microsoft Entra 與 Workload Security 文件確認命令、權限及憑證建立方式,再新增 Azure 帳戶。
新增 Google Cloud 帳戶
新增及保護 Google Cloud Platform 工作負載
新增 Google Cloud Platform 帳戶中的電腦
概觀
Google Cloud Platform(GCP)連接器可連接並管理 GCP 帳戶中的電腦。將 GCP 帳戶新增至 Workload Security 後,與該服務帳戶關聯的 GCP VM 執行個體都會匯入 Workload Security,並顯示在 Computers 頁面中,依服務帳戶及專案分層排列。
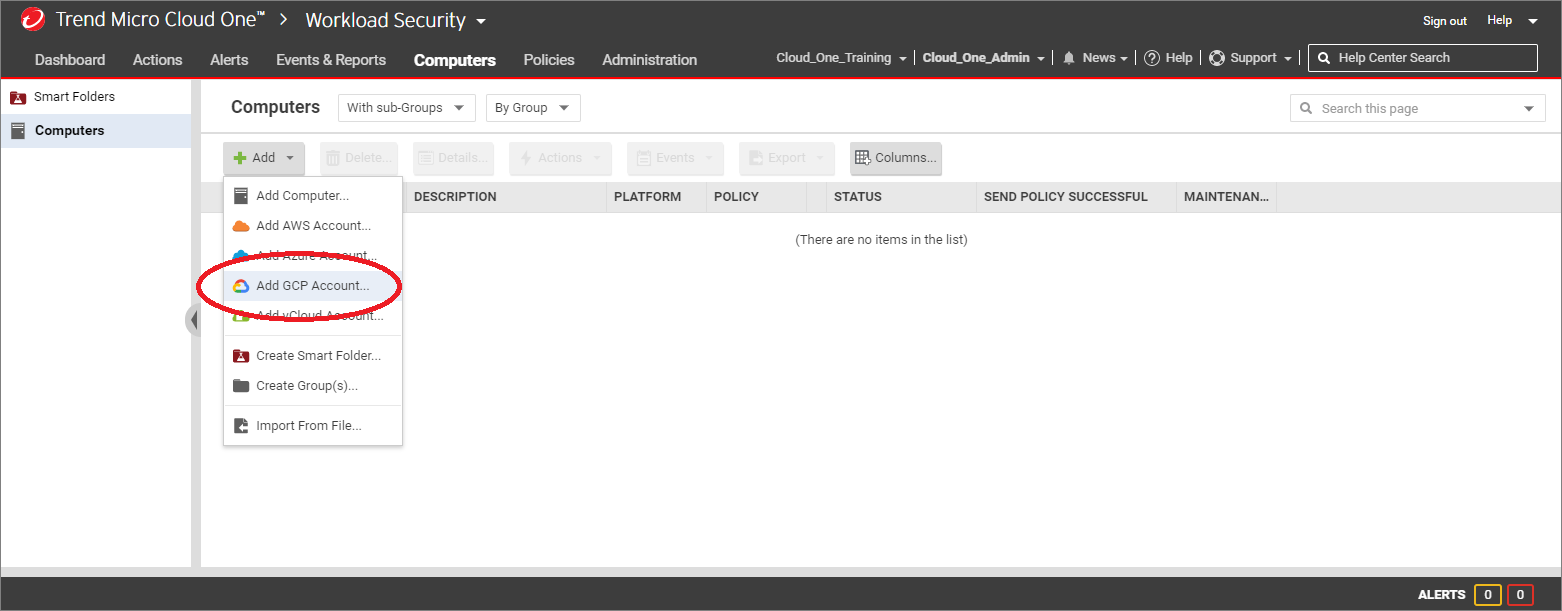
在 Workload Security 主控台中,依序選取 Computers > Add > Add GCP Account。
優點
相較於透過 Computers > Add Computer 個別新增 GCP VM,使用 Computers > Add GCP Account 新增 GCP 帳戶有以下優點:
- GCP 虛擬機器清單的變更會自動反映在 Workload Security 主控台。例如,在 GCP 刪除 VM 執行個體後,對應項目也會自動從主控台消失。若使用 Computers > Add Computer,則必須手動刪除主控台中的舊項目。
- 主控台會依專案整理 VM,方便查看哪些 GCP VM 已受保護。若未新增 GCP 帳戶,所有 GCP 虛擬機器都會顯示在 Computers 的相同根層級。
- 若使用用量計費,較小型的 GCP 執行個體會採用較低費率。若透過 Computers > Add Computer 個別新增,所有 GCP 執行個體無論大小,都會採用最高的 Data Center 費率。
使用 UI 建立 Google 服務帳戶及新增帳戶
參考文件(Google Cloud)
- 現行操作請參閱 建立 Google Cloud Platform 服務帳戶。
- 現行操作請參閱 將 Google Cloud Platform 帳戶新增至 Workload Security。
Cloud One Workload Security:第 01 課-帳戶與雲端連接器 · 22 單元
註冊 Cloud One 帳戶
圖文
註冊新的 Cloud One 舊版帳戶
02:19
新增 AWS 帳戶:概觀與連接方式
圖文
使用 Quick 新增 AWS 帳戶
04:12
使用 cross-account role 新增 AWS 帳戶
05:41
使用 Workload Security API 新增 AWS 連接器
03:51
AWS 連接器 API 程式碼(舊版帳戶)
圖文
使用 AWS CLI 建立 cross-account role
07:12
AWS CLI 程式碼與 Azure 帳戶概觀
圖文
建立 Azure 應用程式
04:53
新增 Azure 帳戶
03:21
使用 Cloud One API 新增 Azure 帳戶
03:21
Azure 帳戶 API 程式碼(舊版帳戶)
圖文
使用 Azure CLI 建立 Azure 應用程式
05:34
Azure CLI 歷史範例與 Google Cloud 帳戶概觀
圖文
建立 Google 服務帳戶
04:14
新增 GCP 帳戶
02:55
使用 API 新增 Google Cloud 帳戶
04:29
GCP 連接器 API 程式碼(舊版帳戶)
圖文
使用 gcloud CLI 建立服務帳戶
05:10
使用 gcloud CLI 設定 API、服務帳戶與金鑰
圖文
本課複習
圖文